End Of April

May 2, 2010

It’s been springtime weather the last couple of days, dark and a bit rainy. Still, the last of the paint-the-little-parts is done, so there is nothing left but to bolt the puppy together. I started by scoring a big win, in that I finally got the fork lock to work. Then I went to the other key item (ignition switch), cleaned and readied it for install, sprayed with silcon, and insterted the key to lube it up. Then I couldn’t get the key out !! Really I tried, and tried …. Ended up having to dismantle to remove the key and … I don’t wanna explain lock cylinders to ya, but they have lots of teeny-tiny parts. And there is a small spring running loose in my house, but I did get the key out. I’m gonna defer to an expert and visit Jay Lock & Key.

I finally got the correct steering stem arrived and headlamp ears. One reflector is busted and that is the one that’s seriously rusted up, so I had to hack saw the thing off. Headlamp cracks are repaired and looks nice with new paint. I have to admit that the thin plastic headlamp bucket is the only cheap thing I’ve found on the bike.

Anyway, there are tons of things installed on the bare-naked frame and it’s beginning to look like a motorcycle.

Mostly assembled

I’m heading into the local ‘big city’ to visit Shamrock Bolt & Screw to get nice shiny new bits for the side cases and the occasional thing that is missing. I can buy them online, but I have to go anyway to get needle and thread for the Standard sewing machine so I can sew up the seat cover.

The box of bagged items is almost empty, the one for items like ignition stuff can now get installed and tested since the wiring loom and battery are ready to go.

Mostly assembled front end

Beginning to look good to me, so I’m opening up a beer and gonna admire for a bit before I start cleaning and installing electrical bits that go from the loom backwards toward the battery. Next day the sun is out I’ll try to get a shot of the official ScoottaaShack Wren who has taken up residence. She doesn’t like my wandering in and out, but she is tolerating me. She seems not to be offended by my country music.
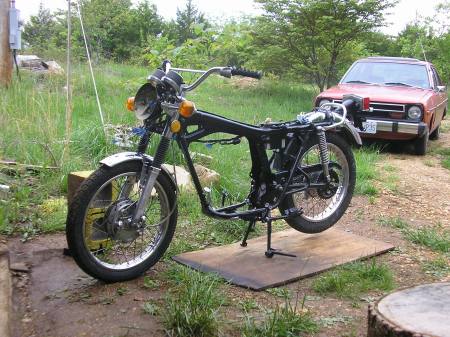
I have been working!

April 24, 2010

So let me catch you up, it’s not important the order that this crap happened but that it did. I ordered some parts and they arrived. I noticed that the fork bridge was incorrect and informed the supplier, they sent a replacement . Weeks later Lloyd comes over and I show him the new fork bridge .. “The new one ain’t the same size as the old one!”.

Aussie neighbor

Damn, shown up by an Aussie! Not to worry, I have a complete steering head coming from Ebay, hope it is correct.

I’m bolting up all kinds of parts to the spiffy looking frame.

First parts bolted on

I’ve aired up the tubes, and installed them and tires on the rims. I’ve cleaned up the brake side hubs and they are ready to install so by tomorrow the girl will be standing on her own feet. I have to admit that what stuff looks like before it’s cleaned is way different that the ‘after look’ as in these two photos:

Front hub before

Front hub and other stuff after

I still have tons of stuff to clean, and there is a lesson here. Next time I will clean as I remove the parts, not as I install them. You may do as you wish, but having to stop to clean crap when I want to install seems, very, very wrong. That’s just me !!

I’ve also learned that you cannot tell how well drum brakes work unless you disconnect all the cables, and levers, and devices that you use to operate them. You must disconnect all that crap and move the hub lever by hand to find out how they work. Trust me here .. after cleaning and lubing them and testing, I know what I’m talking about, and the brakes on this thing are gonna be great, as the linings seem to be new.

Boing!

March 26, 2010

Spring has sprung! A long, dark and cold winter is now over. The forest is busting with new leaf, and sunshine and 60+ days are now becoming common. Time to go to work.

The shop is somewhat organized (I can at least find my tools) and the Honda frame is now strapped down to its assembly bench. There is one nice sunny day (today) but next week is predicted to be free of spring rain, so we’ll get rolling in a few days.

Right now, my new summer car gets the last two items repaired, a tie-rod end and new U-joints. I don’t look like much but it is the best handling car I’ve owned since I let go of its big brother the 510 about 25 years ago.

1979 Datsun 210

A real ‘sleeper’ of a car. Purrs like a kitten, handles like a slot car, and new sound system installed with custom wood speaker boxes under the rear package deck. Slap in a cassette, open the sun roof and cruise the backroads. Yippee !!!

Seat Repair Part 1 of 3

November 25, 2009

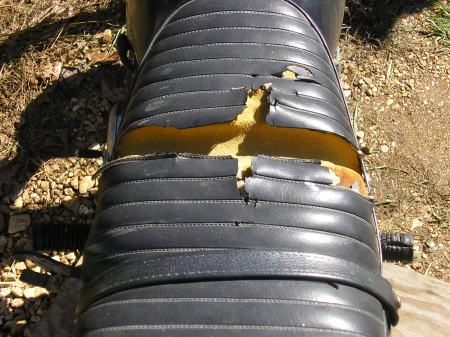
I’ve been trying to start this section of the project for about two weeks, but I’ve been put off by the ‘passenger strap’.

Torn Seat Cover

Put off because I haven’t been able to get the Phillips head screws loose that attach each buckle out of the pan. There is a nut welded on the inside of the seat pan for them and both screws were firmly rust-welded to the pan.

Since up until today I’ve not gotten them to budge, I resorted to drilling and used the extractor set. I scored 50% as one finally came out but the other broke off inside the nut. I’ll have to drill it all the way thru and pick out the remains.

Still I did remove the buckles and strap so I could start the process of stripping the cover and then removing the foam. You need to understand how the cover is attached to the seat pan before you start. There are (a) chrome buttons on the outside of the seat and (b) there are triangle tabs punched in the bottom edge of the pan that pierce the cover on the inside of the pan.

So you apply foam and cover to the pan, then turn it over and begin stretching it on. You pull it snug then pierce the cover with each triangle tab then hammer the tabs closed. Then you pierce the chrome buttons from the outside then you spread apart the cotter key pins. These buttons are for decoration only.

Seat Cover Holding Tabs

That’s not a great picture above but you can see the triangle tabs and the chrome buttons in between. I’ve closed up the twin tabs of the buttons already. Don’t worry about breaking off the tabs as they are worthless. Once they’ve been bent to install the original seat, they cannot be reused. The new seat cover will be installed with functional buttons and/or a chrome strip.

Seat Covering Removed

As bad as things look so far you might think the seat foam is unusable. Not true, the stuff will last for centuries. Yes I will have to fill the gouge in this one, but the rest is quite usable. It will take a knife blade to get it separated from the pan. Between the glue that was originally used and the rust underneath it will be seriously hard to remove. Just wedge a knife blade around it and slowly work it off. It will come off intact and be completely reusable.

Seat Pan Exposed

You should be able to see the rust debris on the foam bottom, and YES the newly exposed pan looks like hell! Water gets inside the seat and goes thru the foam and sits on the top of the pan and rust happens. This looks a little worse than the seat I repaired this winter, but it will be just fine. It will get a serious wire brushing, muriatic acid, and several phosphate treatments, primer and paint, and be just fine.

I have some leather for a new cover, or I can pick up some black Naugahyde, I haven’t decided yet. Install with new buttons that screw into nuts and it will look quite professional.

Progress and Regress

November 21, 2009

This stuff which never sleeps (aka RUST) is a bitch. However, if you don’t take care of it some day you bike will fall apart so it must be done. I figure to be done with the major rust this weekend.

I have the undersides of the fenders cleaned and treated. They don’t look pretty in the pic below but if I attempted to grind off the offended metal there would be nothing but chrome left, so no can do. What you see IS cleaned up with wire brush grinders and sanded. I hope you can see that it is black. That is good. Rust-offended metal will look rusty colored. After sufficient treatment with phosphoric acid it converts the offended metal to iron phosphate, it turns black and the rust is dead. So the underside of the fenders are ready for primer and paint for long term protection.

Underneath of fenders prior to priming

I pulled the tires from all my rims yesterday and they were a bit rusty inside too. They can be propped up on the stool so I used the wire wheel on the bench grinder to do them. Much easier than grinding with a wheel chucked in a drill. So they are cleaned up and got their last phosphate treatment this morning. The inside of the rims will get primer and paint also.

Now the regress part. The only other piece needing paint was the triple tree. I did receive my parts from Bike Boneyard but unfortunately I got the wrong fork bridge. So that portion of the project will be delayed. I sent a pic of my old part and the one received and we’ll see how that goes.

Got the wrong fork bridge delivered

It’s cool, damp, and cloudy today so I can’t paint or take pictures but that’s Ok. I need to finish getting my frame stand put together so I can strap it down and start installing stuff.

Intermission: Rolling Thunder

November 16, 2009

Well this last weekend was the last of the perfect outdoor weather for a while, but I didn’t get much work done on the Honda.   Most of Saturday was donated to my local historical society.

This is a good thing though as history is important.  So I volunteer for various tasks as needed, but I concentrate on those things where I have some skills or expertise.   The fun things concern computer technology, music, acting, but mainly I’m on the Oral History committee.   This is really cool as I am forced to do things, go places, and meet people I would never normally speak to.

Today’s interview went really well and made a great day.  I meet my interview partner at the highway commuter lot, and lucked into this shot of some rolling thunder while waiting.  I had almost no warning, and only a couple of seconds to prepare for this shot.

Rolling Thunder

Rolling Thunder in to Jct. MO 65 & 160

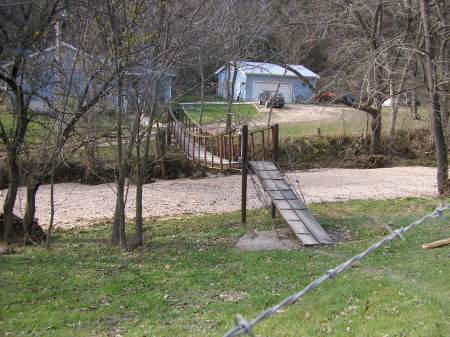
After the interview we took the smallest of back roads thru the county and stumbled upon the other type of rolling thunder you get in the hills of the Ozark Mountain.  Rushing water.  You’ll have to turn on your imagination to hear it in this pic, but you can see where it goes.

Footbridge and wet weather creek

Footbridge & wet weather creek Christian Co. MO

You won’t find many bridges like this left anywhere in America.   These are the type of things I get to stumble upon all the time.  As much a privledge as it is a pleasure, and makes the volunteering ‘worth the time’.


Rear Spring Dismantle

November 11, 2009

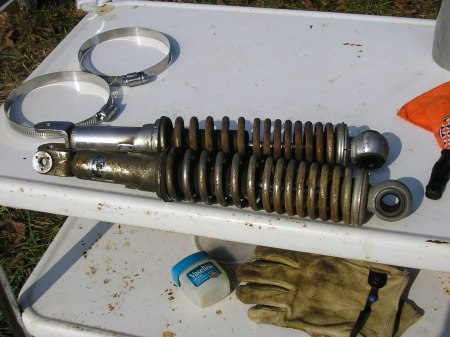
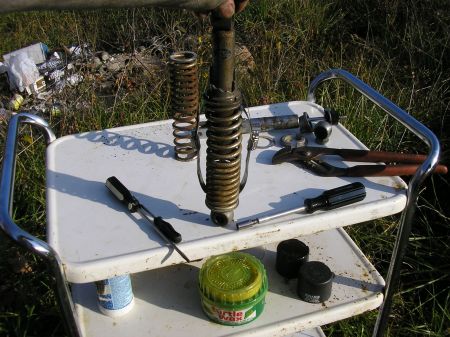
Here’s the rear springs and lordy are they rusty. It’d be nice to have them apart but who has a spring compressor around?

Rear Springs Before

Rear Springs Removed

Well $1.78 at the local hardware store gets you those two stainless steel pipe straps. So to earn 7 points toward my CBMMA* merit badge I picked ’em up. Unscrew them so you can thread them thru the springs like this …

Cheap Spring Compressor 1

Cheap Spring Compressor 1

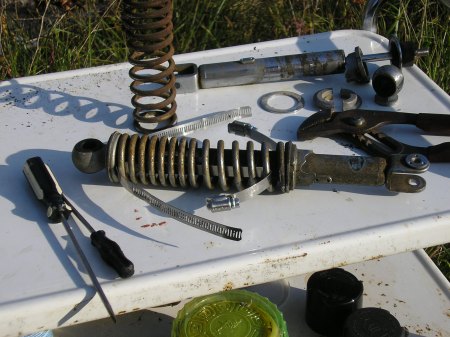
Then just tighten them up. You only need a bit more than 1/4″ in order to get the washer and split ring holder (upper right) off the spring.

Cheap Spring Compressor 2

Cheap Spring Compressor 2

Looks like this just before ‘good things happen’. Compress, push the spring down, then you can get the thing apart. Easy to clean that way. Reverse the process to reassemble.

You do have to ‘fish’ that strap thru the springs, but the two smaller screw drivers make it easy. You can pull with the channel locks once you have the strap out the other end.

Piece o’ cake – Esta papita


* Cheap Bastards Motorcycle Maintenance Association


Fork Disassembly

November 11, 2009

Since the fork bridge will be here in a few days it’s time to break the forks apart. So outside we go to take advantage of the sunshine. Here’s a shot of the triple-tree or steering assembly. You can see that the covers (the things the yellow reflectors are attached to) are quite rusty. I’m not sure how to refabulate those two pieces, but it does mean that the fork tubes inside are gonna be rusty. When things rust they end up being larger that they originally were. So getting the tubes out sometimes takes some hammerin’.

Fork/Steering Stem

Fork & steering stem

Sometimes you wish you had 3 hands. It would make some things easier. PB Blaster soaking the upper fork tubes for two days was almost as good. Rust has swelled the tubes, you gotta swing a hammer (and maybe a drift tool), and you might also want to spread the pinch places apart at the same time. It took some time but I got both tubes driven out.

Then you can remove the caps at the top and pull out the springs. A 8mm allen wrench in the bottom removes the drain plug. The gray oil/water comes out as things drain.

Forks Disassembled

Note rusty tubes and headlamp ears

You see the shiny cap on each fork lower section? This covers a dust seal and the all important fork seal. They are inside that shiny piece, and when you read the shop manual and review the parts fische, it all sounds so damned easy. Just grab your snap-ring pliers and out it pops.

You can kiss my you-know-what. It ain’t happenin’ that way baby !! I’ll bet Honda has a $700 set of snap-ring pliers engineered just for this specific task. My ordinary set has about 5 different sets of tips, but it must be missing the “Honda Fork Seal” tip.

Today is a new day. I’ll get those darn seals out, and I’ll do it without using hammers or ruining those shiny seal covers. This is why people hate those Haynes and Clymer manuals. They say things like “dismantle the forks and replace the seals on the top of the fork lowers”. They neglect to warn you that those 14 simple words will translate into 14 HOURS of frustration. There should be a big warning on the cover of shop manuals, “Only Mentally Depraved Individuals Should Believe The Simpliticy Implied By The Descriptions Contained Herein”.

Pieces & Parts

November 11, 2009

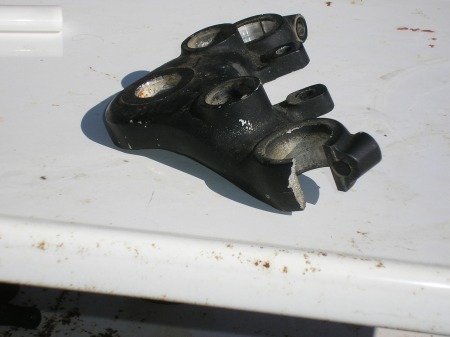
Lets face it, an old motorcycle is going to have some missing or broken items. It’s also going to need some worn out things replaced. Rubber things especially, as they loose flexibility and turn into a strange sort of plasti-crete. This bike has a few broken items, the fork bridge and the clutch side mirror mount. This type metal can’t be repaired so I contacted Bike Boneyard with a parts request. I also included the missing kickstart lever. They had all three at much cheaper prices than I would pay on Ebay.

Fork Bridge

Fork Bridge showing break

Clutch Mount

Note the broken mirror mount

So the Boneyard is sending me some stuff. There will be some other parts orders to make – fork seals, gaskets, missing bolts, rear brake switch, battery, etc. Small parts like this don’t cost much, but just like Ebay shopping, the shipping charges can add up if you order each item from a different place. Common sense here saves dollars.

While I had the handlebars out for the above photo I also took another shot showing how you must deal with the wiring harness. (some folks call it a loom) You must tag and number each connection before you take it apart. I like the blue painters tape as it sticks well, ink marks don’t wipe off, and when you remove it there is no glue residue.

Handlebar Wiring

Handlebar Wiring

Casey showed up late last night with a chord of wood and bitchin’ that the folks refused to let him unload and he had to have an empty truck today. You just don’t take a loaded truck to the weekly “truck pull”… Don’t make no sense.

He knew I’d buy the wood but he also brought a few pounds of deer steaks to sweeten the deal. He and his dad process deer for the local hunters and always have some guys that just dump the carcasses on them. By law it cannot be sold, so I luck into some. Deer steak and eggs for breakfast today.

Painting Tip #1: Use the hammer before you paint.

November 9, 2009

Hammers are not good on new paint. I was forced to acknowledge this nugget of common sense upon inspection of the taillight mount. I’d forgotten to straighten up the license plate ears.

Other tips to a good rattle-can paint job :

2. You cannot have too much light to see with.

3. Shake can often and wipe the nozzle often. Helps prevent globs being spit on parts.

4. The cans loose CO2 as they are used, so make those beauty shots with a new can.

5. Wet/Dry sandpaper is your friend. (200 grit) Paint then wait. Inspect after drying and touch up by sanding. Lots of light coats. Don’t hurry.

Other Parts Painted

Chain Guard

So, most of the important bits are done. For about $20 dollars in paint and primer, and a couple of bucks for sandpaper, CLR, soap, etc. the parts were cleaned, degreased, rust knocked off. CLR (hydrocloric acid) is a cheap cleaner. Then phosphate treatment, two coats of primer, 2 to 6 beauty shots of high gloss enamel and this motorcycle is now saved from the ravages of time and rust. It’s good for another 35 years and looks good to boot.

This is the ‘heavy lifting’ on this project. Stripping the bike into baggies is time consuming, as is the cleaning and painting of the frame. It’s one of the main reasons you cannot make money on resale. No one could afford the labor hours.

Frame Painted

Now re-assembly can start on the frame. Today I’ll rig up my frame stand. I’ll make a trip to town and pick up some items to finish the fuel tank and start cleaning the engine and front fork. I have an email into Bike Boneyard for some needed parts and can get the others on Ebay.